There’s something about childhood favorites that sticks with you—the way peanut butter and chocolate can instantly bring a smile, no matter the day. These truffles take that nostalgic combo and turn it into something a bit more refined, a little more indulgent, but still rooted in comfort. Making them feels like a quiet act of reclaiming that joyful simplicity, but with a grown-up finish you can be proud of.
I love how these truffles are almost like edible memories—crisp shells giving way to a creamy, peanutty center, all coated in glossy chocolate that catches the light just right. They’re perfect for when you want a treat that feels special but is surprisingly easy to whip up. Plus, there’s a quiet satisfaction in rolling those perfect little balls, knowing each one is packed with flavor and just a touch of childhood magic.
Focusing on the nostalgic comfort of childhood treats, but elevating them with sophisticated techniques and ingredients for a grown-up twist.
Nostalgic Treats with a Grown-Up Twist
- Biting into these takes me straight back to summer picnics with my family, where peanut butter cookies were the star.
- There’s a quiet pride in making these—watching the smooth peanut butter melt into rich chocolate, it’s almost hypnotic.
- I love how the crunch of the shell contrasts with the creamy, almost velvety filling inside, it’s a texture dance I crave.
- These truffles remind me that simple ingredients, treated with care, turn into something unexpectedly decadent.
- Nothing beats the surprise of that salty peanut punch against the sweet coating, a flavor combo that always wins me over.
The story behind this recipe
- This recipe was born out of a messy kitchen experiment one rainy afternoon. I wanted something quick, rich, and bite-sized, but with a little more soul than just mixing and rolling. The peanut butter and chocolate combo has always been my secret weapon for instant comfort, and I figured, why not turn it into a fancy little treat?
- I remember the first time I made these for a friends’ gathering—seeing their eyes light up when they bit into that first truffle. It’s funny how something so simple can spark such joy, reminding me that good food doesn’t need to be complicated. Now, whenever I want a small victory in the kitchen, these are my go-to.
- heading: The story behind this recipe
Chocolate Peanut Butter Truffles Trivia
- Chocolate and peanut butter’s pairing dates back to the 1920s, gaining popularity in American candy and baking circles.
- The first known peanut butter chocolates appeared in the early 20th century, often as homemade treats before mass production took over.
- Truffles, originally a French delicacy, evolved from chocolate ganache balls, now adapted worldwide into countless flavor combinations.
Ingredient breakdown: key components
- Peanut Butter: I prefer a creamy, natural peanut butter—smoother texture and richer flavor, but you can swap in chunky if you like a bit of crunch.
- Dark Chocolate: I love using 70% cocoa for depth, but milk chocolate makes it sweeter and softer—your call, really.
- Butter: I use unsalted butter for a clean, rich base; skipping it can make the truffles less glossy and smooth.
- Powdered Sugar: It helps the mixture firm up nicely—if you want less sweetness, reduce slightly, but don’t skip it entirely.
- Cocoa Powder: For dusting, I go for a bright, bitter cocoa—sift it well to avoid clumps, or the coating gets gritty.
- Salt: Just a pinch heightens everything—don’t skip it, even if you’re worried about saltiness, it’s just enough for a flavor boost.
- Optional Add-ins: Chopped peanuts or a drizzle of caramel can add texture or a flavor twist—think about what makes you smile when you bite in.
Spotlight on key ingredients
Peanut Butter:
- I prefer a creamy, natural peanut butter—smoother texture and richer flavor, but you can swap in chunky if you like a bit of crunch.
- The peanut butter’s rich, nutty aroma fills the kitchen when mixing, and it melts into the chocolate, creating a velvety center.
Dark Chocolate:
- I love using 70% cocoa for depth, but milk chocolate makes it sweeter and softer—your call, really.
- When melting, the chocolate becomes glossy and smooth, with a deep, inviting aroma that signals richness and a hint of bitterness.
Notes for ingredient swaps
- Dairy-Free: Swap regular butter for coconut oil or a dairy-free butter alternative. Expect a slightly different richness and a more coconut-forward aroma.
- Peanut Butter: Use almond or cashew butter for a different nutty flavor and slightly different texture—creamier or chunkier, depending on your choice.
- Chocolate: Opt for white or milk chocolate if dark isn’t your thing; these will alter the depth and bitterness but keep the sweetness.
- Powdered Sugar: Honey or maple syrup can work in a pinch, but will add moisture and sweetness—adjust the amount accordingly.
- Cocoa Powder: Use Dutch-processed cocoa for a mellower, less acidic flavor; sifting it helps avoid gritty coatings.
- Add-ins: Chopped roasted peanuts, chopped pretzels, or even a drizzle of caramel can add textural contrast and flavor twists—think about what excites your palate.
- Salt: Finishing with a tiny pinch of flaky sea salt enhances all the flavors, but skip it if you prefer a sweeter, less savory profile.
Equipment & Tools
- Microwave-safe bowl: To melt the chocolate evenly and easily
- Small cookie scoop: To portion consistent-sized truffles
- Parchment-lined baking sheet: For setting and chilling the truffles
- Heatproof spatula: To stir and incorporate melted chocolate
- Fork: To dip and coat the truffles evenly
Step-by-step guide to making truffles
- Equipment & Tools: Prepare a microwave-safe bowl (for melting chocolate), a small cookie scoop (for uniform truffle size), a baking sheet lined with parchment, and a heatproof spatula.
- Melt the chocolate: Microwave chopped dark chocolate in 30-second bursts, stirring each time, until smooth and shiny (~1-2 minutes total). Set aside to cool slightly.
- Mix the filling: In a mixing bowl, combine peanut butter and unsalted butter. Microwave for 20 seconds if needed to soften. Add powdered sugar and a pinch of salt, then stir until smooth.
- Incorporate chocolate: Pour the slightly cooled melted chocolate into the peanut butter mixture. Fold gently until fully combined, glossy, and thick enough to scoop (about 2 minutes).
- Chill the mixture: Cover and refrigerate for 30-45 minutes until firm but pliable. If it becomes too hard, let sit at room temp for 5 minutes before scooping.
- Form truffles: Using the cookie scoop, portion out small balls (~1 inch diameter). Roll gently between palms to smooth. Place on prepared baking sheet.
- Chill again: Refrigerate the formed truffles for another 15-20 minutes until firm and set.
- Coat with chocolate: Re-melt remaining chocolate briefly if needed. Dip each truffle in the melted chocolate, using a fork to lift out, letting excess drip off. Place back on parchment-lined sheet.
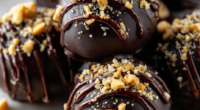
- Final chill & finish: Refrigerate for 10 minutes until the coating is firm and shiny. Optionally, dust with cocoa powder or sprinkle chopped peanuts before the chocolate sets.
- Resting & Finishing: Let the truffles sit at room temperature for 5 minutes before serving. Store in an airtight container in the fridge for up to a week or freeze for longer storage.
Allow the coated truffles to rest at room temperature for 5 minutes before serving. Keep refrigerated in an airtight container. For best shine, bring to room temp slightly before eating.
How to Know It’s Done
- Chocolate coating is glossy and firm without cracks.
- Center is dense but melts slightly when bitten, indicating proper setting.
- Truffles hold shape well without cracking or cracking when gently pressed.

Chocolate Peanut Butter Truffles
Ingredients
Equipment
Method
- Chop the dark chocolate into small pieces and microwave in a microwave-safe bowl in 30-second bursts, stirring each time until smooth and glossy. Set aside to cool slightly.
- In a mixing bowl, combine the softened unsalted butter and peanut butter. Microwave for 20 seconds if needed to soften further, then stir until smooth and creamy.
- Add the sifted powdered sugar and a pinch of salt to the peanut butter mixture. Stir well until the mixture is thick, smooth, and slightly sticky.
- Pour the slightly cooled melted chocolate into the peanut butter mixture. Fold gently with a spatula until fully incorporated and glossy.
- Cover the bowl and chill the mixture in the refrigerator for 30-45 minutes until it firms up enough to scoop.
- Use a small cookie scoop to portion out the chilled mixture into small balls, about 1 inch in diameter. Roll each between your palms to smooth and place on a parchment-lined baking sheet.
- Refrigerate the shaped truffles for another 15-20 minutes until they are firm and well set.
- Re-melt the remaining dark chocolate briefly if needed. Using a fork, dip each truffle into the melted chocolate, turning to coat evenly, then gently tap off excess chocolate.
- Place the coated truffles back on the parchment-lined sheet and refrigerate for 10 minutes until the chocolate coating is glossy and firm.
- If desired, sift cocoa powder over the truffles for an elegant dusting. Let sit at room temperature for 5 minutes before serving.
Pro tips for perfect truffles
- Bolded Mini-Head: Use a microwave-safe bowl for quick, even melting. It prevents chocolate from burning and keeps cleanup easy.
- Bolded Mini-Head: Chill your mixture briefly—around 30 minutes—so it firms up enough for clean, round truffles without cracking.
- Bolded Mini-Head: When dipping, tap the fork gently on the side of the bowl to shake off excess coating—creates a smooth, glossy finish.
- Bolded Mini-Head: Slightly warm your hands when rolling to prevent sticking—your palms will help shape each truffle smoothly.
- Bolded Mini-Head: For shiny chocolate, slightly over-melt the chocolate but remove from heat before it seizes or burns—stir until glossy.
- Bolded Mini-Head: When dusting with cocoa powder, sift it first to avoid clumps and get a fine, even coating that looks professional.
Common mistakes and how to fix them
- FORGOT to chill the filling before forming? Chill for at least 30 minutes to prevent sticking.
- DUMPED too much chocolate into the mixture? Use just enough to get a glossy, thick consistency.
- OVER-TORCHED the chocolate? Melt gently in short bursts, stir well, and remove before burning.
- FAILED to sift cocoa powder? Sift thoroughly to avoid gritty, clumpy coatings that ruin the finish.
Quick fixes and pantry swaps
- When chocolate seizes, splash in a tiny bit of vegetable oil to smooth it out.
- If truffles stick to your hands, dampen palms slightly before rolling.
- Dipped truffles appear dull? Chill briefly to set the chocolate for a shiny finish.
- Over-melted chocolate? Patch with a small piece of unmelted chocolate and stir vigorously.
- Stale peanut butter? Swap with fresh for better flavor and smoother texture.
Prep, store, and reheat tips
- Preparing the filling mixture can be done a day in advance; keep covered in the refrigerator to maintain freshness and flavor.
- Chill the formed truffles in the fridge for 15-20 minutes before coating to ensure they hold shape and are easier to dip.
- Store the finished truffles in an airtight container in the fridge for up to a week; the chocolate coating stays glossy and firm.
- Reheat slightly at room temperature for 5 minutes before serving to restore softness and enhance aroma, especially if stored longer.
- For longer storage, freeze uncoated truffles in a single layer for up to a month; thaw in the fridge before coating and serving.
Top questions about truffles
1. Can I use chunky peanut butter?
Use creamy peanut butter for a smooth, rich center; chunky adds crunch but can make rolling messier.
2. How long should I chill the filling?
Chill the mixture for at least 30 minutes until firm enough to scoop and shape without sticking.
3. Can I melt chocolate without a microwave?
Yes, you can melt the chocolate in short bursts in the microwave or use a double boiler for gentler heat.
4. How long do truffles keep?
Refrigerate the finished truffles for up to a week in an airtight container; freeze for longer storage.
5. How do I get a glossy chocolate coating?
Dip the truffles quickly and tap off excess chocolate for a shiny, smooth coating without cracks.
6. Can I make these less sweet?
Adjust sweetness by reducing powdered sugar or substituting with honey or maple syrup, but watch moisture levels.
7. What if my melted chocolate seizes?
If the chocolate seizes, add a teaspoon of vegetable oil and stir vigorously to smooth it out.
8. How do I shape the truffles easily?
Use a small cookie scoop for uniform size; dampen hands slightly for easier rolling to prevent sticking.
9. Can I customize the filling or coating?
For extra flavor, add chopped roasted peanuts or a drizzle of caramel before chilling the final coat.
10. Should I refrigerate after coating?
Let the coated truffles sit at room temperature for 5 minutes before serving for best texture and shine.
These truffles are a little nostalgia, a little indulgence, and just enough effort to feel like a treat. They’re perfect for sharing when you want something familiar but elevated, with that satisfying crunch and melt-in-your-mouth center. Plus, they remind me that simple ingredients, handled well, can turn into something truly special.
Whenever I make these, I’m transported back to quiet afternoons in the kitchen—smelling rich chocolate, hearing that satisfying crack as I dip, and tasting that perfect peanut-bunch burst. They’re small, but they carry a lot of comfort and joy, especially right now when a little sweetness feels like exactly what’s needed.

Hi, I’m Emily Carter, the founder of Absolute Chaos Mode. Born and raised in Portland, Oregon, I grew up in a household where dinner was equal parts delicious and unpredictable