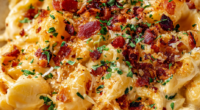
Hell’s Kitchen is chaos on a plate, especially when it comes to this mac and cheese. It’s a dish born from the heat and hustle, where burnt edges and extra cheese tell stories of busy pans and hurried hands. This isn’t about perfection—it’s about embracing the mess and making it delicious.
Cooking this dish feels like a small rebellion against the polished, pristine recipes we often chase. It’s about getting comfortable with the burn, the cheese that drips a little too much, and the crispy bits that come from working fast. It’s honest, it’s real, and damn satisfying.
Focusing on the chaos behind the scenes in Hell’s Kitchen, this mac and cheese is about embracing imperfection—burnt edges, extra cheese, and all. It’s a dish that’s as much about the messy moments as the final bite, capturing the real, unpolished heart of a busy, high-pressure kitchen.
Embracing the chaos of comfort food
- Burnt edges and all, this dish reminds me that even in chaos, there’s beauty in imperfection.
- Nothing beats the rush of tossing cheese into hot pasta, feeling that oozy, melty mess come together.
- I love how a pinch of chaos—like extra crispy bits—turns simple mac and cheese into something memorable.
- This recipe’s about embracing the messy moments—sometimes the burnt part is the tastiest, and I celebrate that.
- Every time I make it, I think of those frantic, loud kitchen nights where perfection isn’t the goal—flavor is.
The chaos behind this dish
- This mac and cheese came about during those long, chaotic nights in the kitchen where I’d throw in whatever cheese and pasta I had left. It’s about the beauty of improvisation—burnt edges, extra cheese, crispy bits—because that’s where the flavor really lives. Cooking under pressure, I learned to embrace the imperfections and turn them into something memorable.
- It’s a dish that’s secretly a reminder that chaos can lead to comfort, and sometimes the burnt bits are the best parts. I’ve served it at midnight stoves, hurried through with a spoonful of pride and a lot of messy cheese. When I think back, those moments of frantic improvisation are what make this dish truly mine.
- heading
- story_type
Contextual origin, trivia, or history
- Hell’s Kitchen, known for its fiery temper and high-pressure kitchens, has inspired dishes that celebrate chaos—this mac and cheese is no exception.
- This recipe echoes the spontaneous, often messy improvisations chefs make when they’re racing against time, embracing burnt edges and crispy bits as flavor enhancers.
- The dish’s rebellious spirit mirrors Gordon Ramsay’s own no-nonsense, raw approach to cooking, where perfection is less important than taste and personality.
Key ingredients and tips
- Cheddar cheese: I love the sharp, tangy bite of aged cheddar; it melts into a gooey, smoky pool. Swap for Gruyère for nuttiness, but keep that melty texture in mind.
- Cream: Richness from heavy cream makes this dish luxuriously smooth—use whole milk if you want a lighter version, but it won’t be quite as silky.
- Pasta: Elbow macaroni is classic, but short shells or cavatappi hold more cheesy sauce; cook to al dente so it doesn’t turn mushy during baking.
- Butter: I rely on good, unsalted butter for that rich, comforting aroma—margarine works in a pinch but lacks depth of flavor. Melt it until bubbly for extra flavor.
- Breadcrumbs: Toasted panko add crunch and contrast; sprinkle generously. For a bit of spice, mix with a pinch of smoked paprika or cayenne before topping.
- Hot sauce: A dash of hot sauce adds a subtle tang and kick that cuts through the richness—use your favorite, but don’t skip it.
- Salt & pepper: It sounds simple, but I always taste and adjust—don’t be shy with seasoning, especially after everything’s mixed.
Focus on Cheese and Pasta
Cheddar cheese:
- I love the sharp, tangy bite of aged cheddar; it melts into a gooey, smoky pool. Swap for Gruyère for nuttiness, but keep that melty texture in mind.
- Pasta: Elbow macaroni is classic, but short shells or cavatappi hold more cheesy sauce; cook to al dente so it doesn’t turn mushy during baking.
Pasta:
- I prefer using a sturdy shape that holds sauce well—cavatappi or shells—so every bite gets plenty of cheesy goodness. Cook just shy of perfect al dente for the best texture after baking.
- Cheddar cheese: Its firm texture melts into a rich, gooey consistency, providing that iconic sharpness. Use freshly grated for the best melt and flavor, avoiding pre-shredded options that contain anti-caking agents.
Notes for ingredient swaps
- Dairy-Free: Use a plant-based cheese and coconut or cashew cream. Expect a slightly different melt and flavor, but it’ll still be rich.
- Gluten-Free: Swap regular pasta for a gluten-free variety like rice or chickpea pasta. Watch cooking times carefully—these can vary and turn mushy fast.
- Cheddar Cheese: A sharp aged cheddar gives that iconic flavor, but you can substitute with Gruyère for nuttiness or Monterey Jack for milder, creamy notes.
- Cream: Heavy cream makes it luxuriously smooth. Lighten it with whole milk or half-and-half if you prefer less richness, though it won’t be quite as velvety.
- Breadcrumbs: Panko adds crunch, but crushed tortilla chips or crushed nuts can also work for a different texture and flavor profile.
- Hot Sauce: Adds a subtle tang and heat. Use your favorite for a personalized kick, or skip for a milder dish.
- Butter: Unsalted butter is best for control over salt, but margarine can be a quick substitute—just expect a slightly different flavor and less depth.
Equipment & Tools
- Large pot: Boil pasta efficiently in a large volume of salted water.
- Heavy-bottomed skillet: Create a smooth, even cheese sauce and crisp topping.
- Whisk: Stir cheese and cream, ensuring smooth, lump-free sauce.
- Baking dish or ovenproof skillet: Bake the assembled mac and cheese for a crispy top.
- Oven: Finish with a golden, crispy topping and bubbling edges.
Step-by-step guide for Hell’s Kitchen Mac and Cheese
- Gather your equipment: a large pot for boiling pasta, a heavy-bottomed skillet for finishing, a whisk for stirring, and a baking dish if baking. Preheat your oven to 200°C (390°F) if you plan to bake the mac and cheese later.
- Cook the pasta: Boil water with a good pinch of salt. Add the elbow macaroni and cook until just al dente, about 2 minutes less than package directions. Drain and set aside.
- Make the cheese sauce: In the skillet, melt butter over medium heat (around 160°C/320°F). Once melted and bubbling, add grated cheddar cheese and a splash of cream. Stir until melted, smooth, and oozy, about 2 minutes. Meanwhile, season with salt, pepper, and a dash of hot sauce.
- Combine pasta and sauce: Add the drained pasta directly into the cheese sauce. Toss well to coat every piece, feeling the rich, cheesy aroma fill the kitchen. If it looks too thick, add a splash more cream or a little hot pasta water to loosen.
- Crisp the edges: For extra crunch, sprinkle panko breadcrumbs over the top. You can mix in a pinch of smoked paprika or cayenne for a smoky kick. Place in the oven for 10-15 minutes, until bubbling and golden on top.
- Finish with crispy bits: For that charred, slightly burnt flavor, broil for an extra 2-3 minutes, watching closely so it doesn’t overdo it. The top should crackle and smell delightfully toasted.
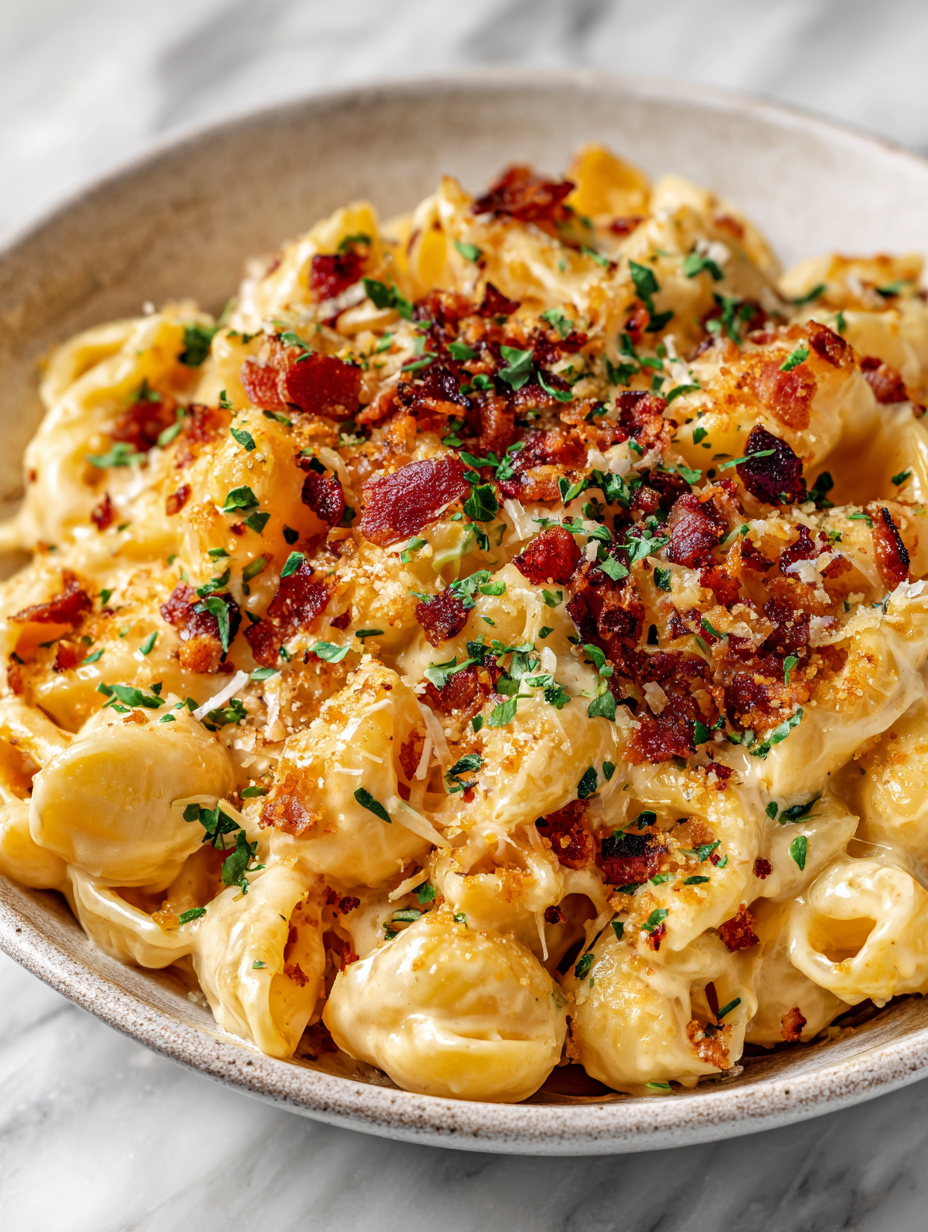
- Rest and serve: Let the dish sit for 5 minutes off the heat. Serve in bowls, noting the contrast of creamy sauce with crispy edges and gooey cheese. Enjoy the chaos in every bite.
Allow the dish to rest for 5 minutes before serving. This helps the sauce thicken slightly and makes for easier plating. Serve directly from the skillet or transfer to a platter, making sure to include crispy bits and gooey cheese in each serving.
How to Know It’s Done
- Cheese sauce is bubbling and smooth, with a slightly golden hue on top.
- Pasta is al dente, holding shape but still tender and not mushy.
- Crispy topping is golden brown and crackly, with a smoky aroma.
Hell’s Kitchen Chaos Mac and Cheese
Ingredients
Equipment
Method
- Bring a large pot of salted water to a boil, then add the elbow macaroni and cook until just shy of al dente, about 2 minutes less than package instructions. Drain and set aside.
- In a heavy-bottomed skillet over medium heat, melt the butter until it bubbles and releases a toasty aroma. Stir frequently to prevent burning, about 1-2 minutes.
- Add the grated cheddar cheese and a splash of heavy cream to the skillet. Stir gently with a whisk until the cheese melts into a smooth, oozy sauce, about 2 minutes. Season with salt, pepper, and a dash of hot sauce.
- Fold the drained pasta into the cheese sauce, tossing to coat each piece evenly. The mixture should look creamy and cheesy, with the pasta generously coated. If too thick, stir in a splash of hot pasta water or additional cream.
- Sprinkle the toasted panko breadcrumbs over the top of the pasta mixture. For extra flavor, toss the breadcrumbs with a pinch of smoked paprika or cayenne before scattering.
- Transfer the skillet or pour the mixture into a baking dish. Place in a preheated oven at 200°C (390°F) and bake until bubbling and golden on top, about 10-15 minutes.
- For a crispy, charred crust, broil the dish for an additional 2-3 minutes, watching carefully to prevent burning. The top should crackle with toasted breadcrumbs and aroma of burnt cheese.
- Remove from the oven and let rest for 5 minutes. This allows the sauce to thicken slightly and makes serving easier. The final dish will have crispy edges, melted cheese, and a creamy center with crispy topping.
- Serve hot, scooping out portions that showcase the contrast of crispy, burnt edges and gooey, cheesy interior. Enjoy the imperfect, satisfying chaos of this mac and cheese.
Notes
Pro tips for perfect mac and cheese
- Bold cheese: Grate your cheese fresh; it melts faster and becomes irresistibly gooey and smoky in the sauce.
- Sizzle butter: Melt butter over medium heat until bubbling and slightly nutty-scented; it adds depth and richness to your sauce.
- Cheese layer: Add cheese off the heat and stir quickly; this prevents clumping and results in a silky, oozy texture.
- Breadcrumb crunch: Toast breadcrumbs in a hot, dry skillet until golden and crispy; sprinkle generously for contrast and crunch.
- Broil watch: Broil the top until golden and crackly—stay nearby, as burnt bits happen fast and add smoky flavor.
- Salt after: Taste and adjust seasoning after mixing cheese and pasta; salt enhances flavor and balances richness.
- Rest briefly: Let the dish sit 5 minutes after baking; this thickens the sauce and makes serving easier, with crispy edges intact.
Common mistakes and how to fix them
- FORGOT to watch cheese melt → Stir continuously to prevent burning.
- DUMPED pasta water in sauce → Save some pasta water for looseness if needed.
- OVER-TORCHED cheese topping → Broil in short bursts, check often to avoid burning.
- MISTAKENLY used cold cheese → Grate cheese directly from fridge for better melt and consistency.
Quick fixes and pantry swaps
- When cheese clumps, splash in a bit of hot pasta water and stir gently.
- If sauce seizes, patch with a touch more cream and warm slowly, stirring constantly.
- When breadcrumbs burn quickly, shield with foil or reduce oven temperature.
- If cheese separates, rescue with a quick whisk off heat to smooth it out.
- When pasta sticks or overcooks, swap in a fresh batch and add to the sauce immediately.
Prep, store, and reheat tips
- Prepare the cheese sauce and cook pasta up to a day in advance; keep separate in airtight containers in the fridge. Reheat until bubbling for that fresh, gooey feel.
- Assemble the mac and cheese without baking; cover tightly and store in the fridge for up to 24 hours. The flavors deepen overnight, making it richer and more integrated.
- Baked leftovers keep well for 2-3 days in the fridge. Expect the cheese to firm up, but gently reheat in the oven or microwave until hot and creamy again.
- To reheat, cover with foil and bake at 180°C (350°F) for about 15-20 minutes or until bubbling. The top may crisp up more, so broil briefly if needed for that toasted crunch.
- For the best sensory experience, reheat slowly—avoid overheating quickly to prevent cheese separation or dryness. Feel the warmth and smell that cheesy aroma again, just like fresh out of the oven.
Top questions about Hell’s Kitchen Mac and Cheese
1. What cheese is best for this dish?
Use a sharp cheddar for that tangy, gooey melt. If you want a milder flavor, Monterey Jack works well and stays creamy.
2. How should I cook the pasta?
Cook the pasta just shy of al dente—about 2 minutes less than package suggests. It finishes cooking in the oven and prevents mushiness.
3. How do I get a crispy topping?
Broiling at the end adds a crispy, golden top. Keep a close eye, about 2-3 minutes, or it’ll burn fast.
4. My cheese sauce is clumpy, what do I do?
If the cheese sauce looks grainy, remove from heat and stir in a little hot cream or pasta water until smooth.
5. Why isn’t my cheese melting smoothly?
Use fresh, grated cheese and melt it slowly off the heat. Pre-shredded cheese often contains anti-caking agents that hinder melting.
6. My sauce is too thick, how can I fix it?
Add a splash of hot pasta water or cream to loosen a thick, gloopy sauce and restore that silky texture.
7. How can I add more flavor to the topping?
For a smoky flavor, sprinkle in a pinch of smoked paprika or cayenne with the breadcrumbs before toasting.
8. What oven temperature should I use?
Bake in a preheated oven at 200°C (390°F) until bubbly and golden, about 15 minutes. Broiling for a minute or two enhances crunch.
9. How long can I store leftovers?
Leftovers can be stored in the fridge for 2-3 days. Reheat in the oven until bubbling and crispy on top again.
10. What if my cheese sauce breaks after reheating?
If cheese separates during reheating, whisk it off the heat or add a little more cream to smooth it out.
This mac and cheese isn’t about pristine presentation; it’s about the chaos, the burnt edges, and that cheesy, crispy top. It’s a dish that embraces the mess, much like those frantic kitchen nights where perfection takes a backseat to flavor.
Even with all its imperfections, every bite reminds me that some of the best comfort food is born from a little chaos and a lot of honesty in the kitchen. It’s raw, it’s real, and it’s exactly what I crave when I need something hearty and unapologetic.

Hi, I’m Emily Carter, the founder of Absolute Chaos Mode. Born and raised in Portland, Oregon, I grew up in a household where dinner was equal parts delicious and unpredictable