
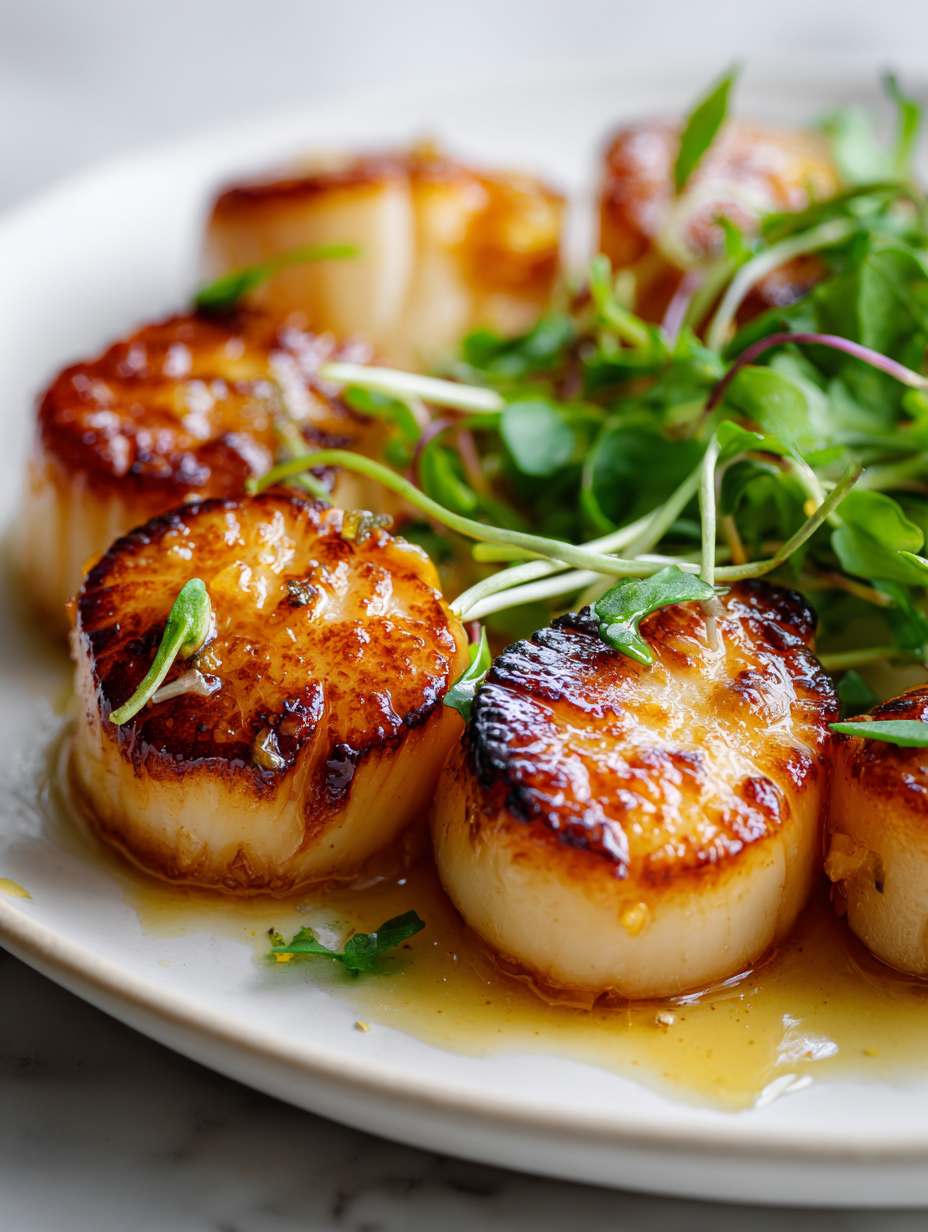
Getting the perfect sear on scallops isn’t just about high heat; it’s about finesse and patience. Small adjustments in your pan’s temperature can turn a good dish into something memorable. I’ve learned that a steady, controlled heat lets the scallops develop that gorgeous amber crust while staying tender inside.
This recipe is a reminder that precision in heat isn’t just technical—it’s personal. Watching the scallops transform from raw to beautifully seared feels like a quiet victory. It’s a simple technique, but mastering it makes all the difference in flavor and texture, especially when I want a dish that’s both elegant and straightforward.
I keep going back to this method because it’s reliable, almost meditative. The key is paying attention to the small cues—the crackle, the color change—that tell you you’re on the right track. It’s a dance of small adjustments that yields a perfectly cooked scallop every time.
Focusing on the overlooked importance of precise heat control to achieve the perfect sear and tender interior in scallops, emphasizing how small adjustments make a big difference in flavor and texture.
The subtle art of heat mastery
- Seared scallops remind me of summer evenings by the coast, their delicate sweetness perfectly contrasted by that crispy crust.
- Watching the scallops transform from translucent to opaque with that golden edge gives me a quiet thrill every time.
- I used to fear overcooking these tiny treasures, but mastering that perfect sear feels like a small, proud victory.
- This dish is my go-to when I want something elegant but unfussy, a real testament to simple techniques done right.
- Searing scallops has become my favorite way to bring a touch of luxury to weeknight dinners—fast, flavorful, satisfying.
The story behind this recipe
- Seared scallops always remind me of a trip to Maine where I first tasted them at a tiny coastal shack. That moment, sitting with salt air in my hair and the scent of butter sizzling in the pan, stuck with me. It’s funny how a simple dish can carry that much memory, right?
- Ever since, I’ve been chasing that perfect sear—crisp on the outside, tender inside. I realized it’s all about tiny adjustments—heat control, timing, patience. A good sear isn’t just technique; it’s a little act of mindfulness, a moment of quiet focus over the stove.
- heading: The subtle art of heat mastery
Contextual origin, trivia, or history
- Pan-searing scallops became popular in French cuisine, especially in coastal regions where fresh seafood is abundant.
- The technique of searing delicate seafood like scallops developed alongside the rise of fine dining in the 20th century, emphasizing crisp textures and quick cooking.
- In some cultures, scallops were once considered a luxury item, reserved for special occasions, which is why perfect searing became a hallmark of gourmet cooking.
- Historically, scallops were cooked over open flames or in simple pans, but modern techniques emphasize precise heat control for optimal texture.
Ingredient breakdown
- Fresh scallops: I look for ones with a firm, slightly moist texture and a clean, briny smell—skip the ones with a fishy aroma. You want that ocean-fresh pop in every bite.
- Kosher salt: I use a generous pinch to season just before searing; it helps draw out moisture and enhances natural sweetness. Too much can make them salty, so go easy at first.
- Black pepper: Freshly ground, it adds a subtle spice that amplifies the crust. I prefer adding it right before searing so it doesn’t burn and turn bitter.
- High-smoke-point oil: I reach for avocado or grapeseed oil—smoky and neutral, they let the scallops shine without introducing unwanted flavors. Keep the heat steady, not smoking hot.
- Butter: I add a small knob at the end—rich, nutty, with a hint of caramel. It finishes the scallops beautifully, but don’t overdo it; too much can drown their delicate flavor.
- Lemon: A squeeze just before serving brightens everything up—vivid, zesty, and perfectly balancing the richness. Skip it if you prefer a milder finish.
- Herbs (like parsley or thyme): I like a quick chop and a sprinkle over the hot scallops—fresh, aromatic, and a little burst of color on the plate. Use sparingly so they don’t overpower.
Spotlight on key ingredients
Scallops:
- Fresh scallops: I look for ones with a firm, slightly moist texture and a clean, briny smell—skip the ones with a fishy aroma. You want that ocean-fresh pop in every bite.
- Kosher salt: I use a generous pinch to season just before searing; it helps draw out moisture and enhances natural sweetness. Too much can make them salty, so go easy at first.
- Black pepper: Freshly ground, it adds a subtle spice that amplifies the crust. I prefer adding it right before searing so it doesn’t burn and turn bitter.
Seasoning & finishing fats:
- High-smoke-point oil: I reach for avocado or grapeseed oil—smoky and neutral, they let the scallops shine without introducing unwanted flavors. Keep the heat steady, not smoking hot.
- Butter: I add a small knob at the end—rich, nutty, with a hint of caramel. It finishes the scallops beautifully, but don’t overdo it; too much can drown their delicate flavor.
- Lemon: A squeeze just before serving brightens everything up—vivid, zesty, and perfectly balancing the richness. Skip it if you prefer a milder finish.
Notes for ingredient swaps
- Seafood-Free: Use firm tofu cut into thick slices; it absorbs flavors well and gets a nice crust, but lacks the ocean-briny note.
- Dairy-Free: Skip butter and use a splash of olive oil for searing; it won’t add the same richness but keeps things light.
- Low-Sodium: Use a salt substitute or very minimal salt; scallops are naturally sweet, so they don’t need much seasoning.
- Vegan: Replace scallops with king oyster mushroom caps sliced thick; they develop a meaty texture and sear beautifully.
- Gluten-Free: Ensure your soy sauce or seasoning blends are gluten-free if using with herbs; otherwise, stick to simple salt and pepper.
- Herb Variations: Swap parsley or thyme for cilantro or basil for a different fresh, aromatic punch.
- Lemon Alternatives: Use lime or a splash of vinegar for acidity; each adds a slightly different bright note.
Equipment & Tools
- Heavy skillet (stainless or cast iron): Provides even heat for a perfect sear.
- Spatula or tongs: Turns scallops gently without breaking them.
- Paper towels: Dry scallops thoroughly for optimal browning.
- Small bowl: For seasoning or melting butter.
- Spoon: For basting the scallops with butter.
Step-by-step guide to pan searing
- Equipment & Tools: Gather a heavy-bottomed skillet (preferably stainless steel or cast iron), a spatula or tongs, a paper towels, a small bowl for seasoning, and a spoon for basting.
- Pat the scallops dry thoroughly with paper towels—moisture is the enemy of a good sear. Season lightly with kosher salt and freshly ground pepper just before cooking.
- Heat the skillet over medium-high heat—aim for about 200°C (390°F). Add a thin layer of high-smoke-point oil, like grapeseed or avocado, and let it shimmer but not smoke.
- Place the scallops in the hot pan, spacing them apart. Sear without moving for 2-3 minutes until the underside is golden brown and releases easily from the pan.
- Flip the scallops carefully using tongs or a spatula. Cook for another 1-2 minutes, until the second side is also golden and the scallops are opaque around the edges.
- Optional: During the last minute, add a small knob of butter and spoon the melted butter over the scallops (basting). This adds richness and a glossy finish.
- Remove the scallops from the pan. Rest for 1-2 minutes to allow juices to settle, then serve immediately with a squeeze of lemon and herbs if desired.
Serve immediately on a warm plate, garnished with lemon wedges and fresh herbs. Rest briefly to let the juices redistribute, then enjoy the crisp exterior and tender interior.
How to Know It’s Done
- Golden-brown crust with a slight shimmer, not burnt.
- Scallops are firm but not rubbery when pressed lightly.
- Internal color is opaque from edges inward, with a translucent center.
Perfect Pan-Seared Scallops
Ingredients
Equipment
Method
- Pat the scallops dry thoroughly with paper towels to remove excess moisture, which helps achieve a good sear. Lightly sprinkle the scallops with kosher salt and freshly ground black pepper just before cooking.
- Place a heavy skillet over medium-high heat and add the oil. Let it heat until shimmering and just starts to smoke lightly—this ensures the perfect sear.
- Carefully place the scallops in the hot pan, spacing them apart. Let them cook without moving for about 2-3 minutes, until the underside develops a deep golden-brown crust and releases easily from the pan.
- Gently flip each scallop using tongs or a spatula, being careful not to tear the delicate flesh. Cook for another 1-2 minutes until the second side is also golden and the scallops are just opaque around the edges.
- Add a tablespoon of butter to the pan, then tilt the pan slightly to spoon the melted butter over the scallops. Continue basting for about 30 seconds to add richness and a glossy finish.
- Remove the scallops from the pan and transfer them to a plate. Squeeze fresh lemon juice over the top and sprinkle with chopped herbs for vibrant flavor and color.
- Let the scallops rest for a minute to allow juices to redistribute, then serve immediately while they’re warm, crispy on the outside, and tender inside.
Notes
Pro tips for perfect scallops
- Preheat thoroughly: Make sure your pan is hot enough—about 200°C (390°F)—before adding scallops for that perfect sear.
- Dry scallops well: Pat them completely dry with paper towels; moisture prevents proper browning and crispness.
- Use high-smoke-point oil: Reach for grapeseed or avocado oil to avoid smoking and burning, ensuring a clean sear.
- Don’t overcrowd: Space scallops apart in the pan—crowding causes steaming, not searing, ruining that crispy crust.
- Resist flip early: Wait until the underside is golden and releases easily—about 2-3 minutes—then flip gently.
- Baste with butter: During the last minute, add butter and spoon it over the scallops for richness and shine.
- Rest briefly: Let scallops sit for a minute after cooking to allow juices to redistribute before serving.
Common mistakes and how to fix them
- FORGOT to dry scallops thoroughly; they won’t sear properly—pat dry with paper towels.
- DUMPED oil directly into a cold pan; always heat the oil first until shimmering.
- OVER-TORCHED the scallops; reduce heat if they turn dark before cooking through.
- MISJUDGED searing time; flip when the underside is golden and easily releases from the pan.
Quick fixes for perfect searing
- If scallops release water, dump and pat dry again for better searing.
- When oil shimmers but doesn’t smoke, you’re at the right temperature—add scallops then.
- Splash a few drops of water in the pan to test heat; crackling means hot enough.
- Patch a stuck scallop by gently loosening with a spatula—don’t force it, or tear may occur.
- Shield a smoky kitchen by opening windows and reducing heat if smoke appears.
Prep, store, and reheat tips
- Pat the scallops dry thoroughly before storing; excess moisture can make them slimy and affect searing quality.
- Store scallops in an airtight container in the fridge for up to 24 hours; keep them cold to maintain freshness.
- For longer storage, freeze scallops in a sealed bag for up to 2 months; thaw in the fridge overnight before cooking.
- Reheat seared scallops gently in a warm skillet over low heat; avoid overheating to prevent rubberiness and preserve their delicate texture.
Top questions about pan seared scallops
1. How do I tell if scallops are fresh?
Look for scallops that are firm, moist, and have a fresh ocean smell—skip any with a fishy or sour odor.
2. Should I dry scallops before searing?
Pat scallops dry with paper towels to remove excess moisture, which helps develop that beautiful golden crust.
3. What’s the right temperature for searing scallops?
Use a hot skillet—around 200°C (390°F)—with a high-smoke-point oil like grapeseed for the best sear.
4. How long should I cook scallops on each side?
Sear scallops for about 2-3 minutes per side until golden and just opaque inside, then flip carefully.
5. How do I know when to flip the scallops?
When the scallops release easily from the pan and have a golden crust, they’re ready to flip.
6. Should I baste scallops with butter?
Add a small knob of butter in the last minute and spoon over scallops for richness and shine.
7. Can I serve scallops immediately after cooking?
Let scallops rest for 1-2 minutes after cooking to let juices settle before serving.
8. What signs indicate scallops are overcooked?
Overcooked scallops turn rubbery and lose flavor; watch for an opaque color from edges inward.
9. When should I add lemon to scallops?
Use fresh lemon juice or lime to brighten the dish just before serving—avoid adding it during cooking.
10. How should I store scallops before cooking?
Store raw scallops in the coldest part of the fridge, covered, and cook within 24 hours for best freshness.
Mastering this simple sear on scallops is more than just a technique; it’s about trusting your instincts and paying close attention to the little cues. When you hear that initial crackle and see the perfect amber crust, you know you’ve nailed it. That first bite—crispy exterior, tender inside—makes all the fuss worth it.
In the end, this dish is a reminder that precision and patience turn humble ingredients into something special. It’s a quiet joy, a small achievement that elevates any meal. Sometimes, the simplest techniques deliver the most memorable moments at the table.

Hi, I’m Emily Carter, the founder of Absolute Chaos Mode. Born and raised in Portland, Oregon, I grew up in a household where dinner was equal parts delicious and unpredictable