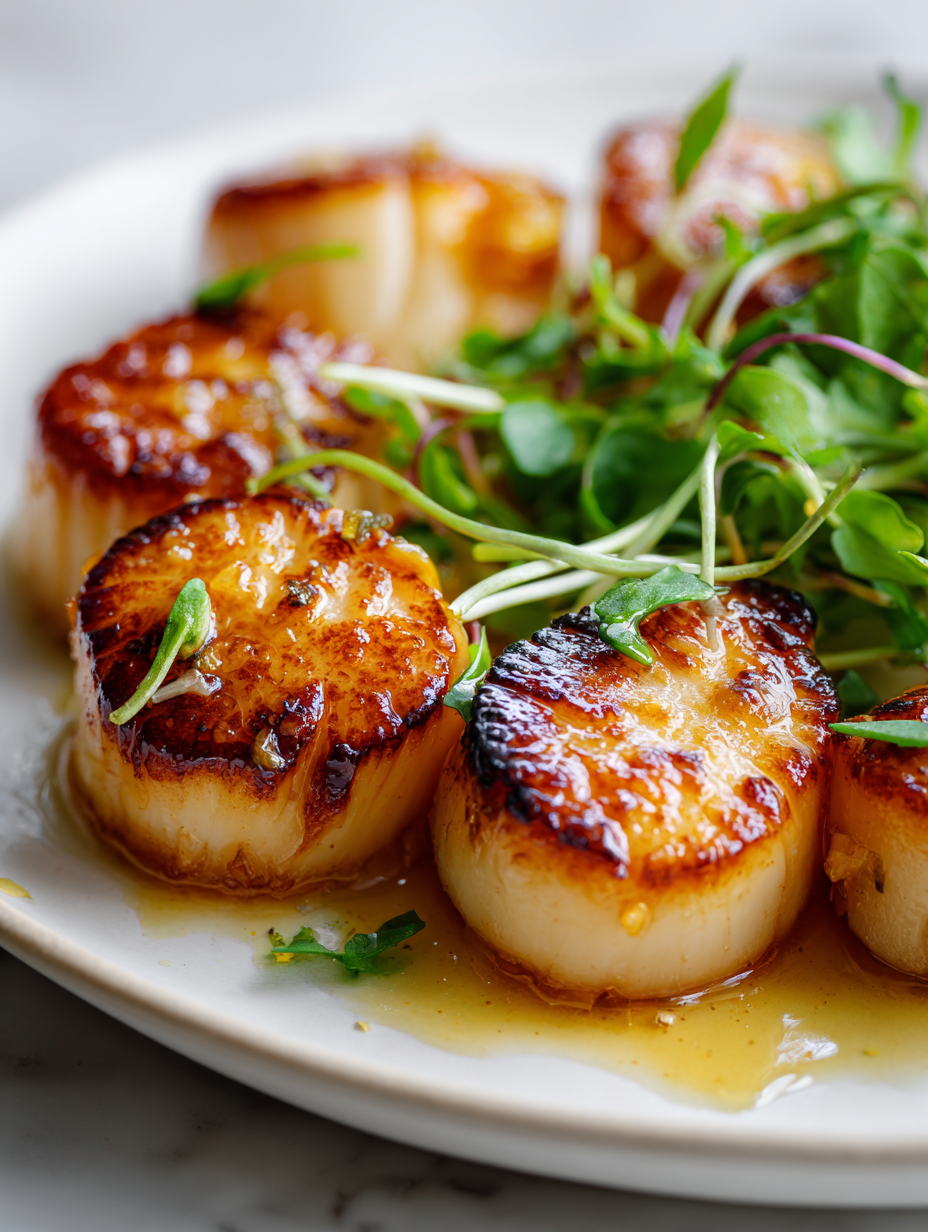
Getting that perfect sear on scallops isn’t just about high heat; it’s about the patience to control it. I’ve ruined more than a few scallops trying to rush the process, only to end up with a rubbery texture and a pale, lackluster crust. But once you dial in that precise heat, each scallop transforms into a tender, caramelized jewel that bursts with sweetness with every bite.
This recipe is a quiet reminder that simplicity, paired with attention to detail, can turn a humble ingredient into something special. I love the way the surface crisps up with a golden-brown hue while the inside remains luxuriously tender. It’s a dance between heat, timing, and technique that I keep coming back to, especially when I want to impress without fuss.
Focusing on the overlooked importance of precise heat control to achieve the perfect caramelized crust on scallops, turning a simple sear into a multi-sensory experience that highlights their natural sweetness and tender texture.
The subtle craft of heat control
- Seared scallops remind me of summer evenings by the coast, where simplicity and good ingredients shine.
- I’ve watched friends get frustrated trying to perfect their sear, but patience and a hot pan make all the difference.
- The first time I got that caramelized crust just right, I felt like I unlocked a secret in my kitchen.
- There’s a quiet pride in turning out perfectly crisp scallops after a shaky start with uneven heat.
- Nothing beats that moment when the aroma of browned butter and seared seafood fills the room.
The subtle craft of heat control
- Seared scallops remind me of lazy coastal weekends, where the ocean’s briny scent mingles with the sizzle of a hot pan. It’s a dish that’s simple but demands respect for its delicate nature.
- I first learned to sear scallops when I was trying to impress a dinner guest who loved seafood. That moment of patience, waiting for the perfect golden crust, felt like a small victory.
- Over the years, I’ve realized that the secret isn’t just in the technique but in the quiet focus—listening to the crackle, watching for that caramel hue, and knowing when to flip.
Contextual origin, trivia, or history
- Pan searing as a technique dates back to ancient civilizations, where high heat was used to quickly cook and flavor foods over open flames.
- Scallops have been prized in coastal cuisines for centuries, especially in French and Japanese cooking, for their sweet, delicate flavor and tender texture.
- The modern method of searing scallops in a hot pan with butter or oil became popular in the 20th century, aligning with the rise of fine dining and home chef experimentation.
- Historically, scallops were considered a luxury ingredient, often reserved for special occasions due to their cost and rarity in certain regions.
- Quirky trivia: In the 1800s, some chefs believed that searing scallops with a touch of lemon juice helped preserve their freshness during transport.
Ingredient breakdown: key components
- Scallops: I look for firm, dry scallops with a slightly translucent appearance; avoid anything slimy or overly wet—pat them dry thoroughly to get that perfect sear.
- Salt: I prefer kosher salt for even seasoning; sprinkle generously just before searing to enhance the natural sweetness without drawing out too much moisture.
- Oil: I use a high smoke-point oil like grapeseed or canola; it helps achieve that crisp crust without burning at high heat, and I look for a shimmering surface before adding scallops.
- Butter: I add just a small knob of butter after searing to give a rich, nutty flavor; don’t add it too early, or it’ll burn and create bitterness.
- Lemon: Brightens the dish with a zesty punch; I squeeze just before serving—nothing beats that fresh, citrusy aroma that wakes up the palate.
- Herbs: A sprinkle of chopped parsley or chives adds freshness; I only add these after searing so they stay vibrant and don’t wilt prematurely.
- Pepper: I prefer freshly cracked black pepper for a slight spice; I season at the end to keep its lively, aromatic kick intact.
Spotlight on key ingredients
Scallops:
- I look for firm, dry scallops with a slightly translucent appearance; avoid anything slimy or overly wet—pat them dry thoroughly to get that perfect sear.
- Salt: I prefer kosher salt for even seasoning; sprinkle generously just before searing to enhance the natural sweetness without drawing out too much moisture.
- Oil: I use a high smoke-point oil like grapeseed or canola; it helps achieve that crisp crust without burning at high heat, and I look for a shimmering surface before adding scallops.
Butter and finishing aromatics:
- Butter: I add just a small knob of butter after searing to give a rich, nutty flavor; don’t add it too early, or it’ll burn and create bitterness.
- Lemon: Brightens the dish with a zesty punch; I squeeze just before serving—nothing beats that fresh, citrusy aroma that wakes up the palate.
- Herbs: A sprinkle of chopped parsley or chives adds freshness; I only add these after searing so they stay vibrant and don’t wilt prematurely.
Notes for ingredient swaps
- Seafood-Free: Use firm tofu slices, pressed and patted dry, for a vegetarian alternative that still sears well and absorbs flavors.
- Oil: Swap grapeseed or canola with peanut or avocado oil—both handle high heat and add subtle nutty or buttery notes.
- Butter: Replace with ghee for a similar rich finish or use a splash of olive oil for a more mellow, fruity aroma.
- Lemon: Use lime or a splash of white wine vinegar if lemon isn’t available—each adds a bright, acidic lift.
- Herbs: Fresh chives or dill can replace parsley for a different herbaceous note that still complements seafood.
- Salt: Fine sea salt can be used instead of kosher; just be mindful of quantity, as it’s more concentrated.
- Pepper: White pepper offers a milder heat and less visual contrast, ideal if you prefer a subtler spice.
Equipment & Tools
- Heavy skillet: Ensure even heat for a perfect sear.
- Tongs: Flip scallops gently without breaking them.
- Small spoon: Baste with melted butter for added flavor.
- Paper towels: Dry scallops thoroughly to prevent steaming.
Step-by-step guide to searing scallops
- Equipment & Tools: Gather a heavy-bottomed skillet (preferably stainless steel or cast iron) for even heat distribution. Have tongs for flipping, a small spoon for butter, and a paper towel for drying scallops ready.
- Pat the scallops dry thoroughly with a paper towel—moisture is the enemy of a good sear. Season generously with kosher salt just before cooking.
- Heat the skillet over medium-high heat until it’s shimmering—about 2 minutes. Add a high smoke-point oil, like grapeseed, and let it heat until it shimmers and just begins to smoke.
- Carefully place the scallops in the hot pan, leaving space between each—don’t crowd them. Sear for about 2 minutes without moving, until they develop a golden-brown crust and release easily when nudged.
- Flip the scallops using tongs or a spatula. Sear the other side for another 1.5–2 minutes. The edges should be opaque, and the bottom golden and caramelized.
- Immediately add a small knob of butter to the pan. Tilt the pan slightly and spoon the melted butter over the scallops for about 30 seconds—this adds richness and helps with flavor development.
- Check for doneness: the scallops should be firm but still slightly tender in the center, with a translucent appearance in the middle. Use a visual cue for perfect sear—deep golden crust and slight bounce when pressed.
- Rest & Finish: Transfer scallops to a plate; let them rest for 1 minute to settle juices. Serve immediately, drizzled with lemon juice and garnished with herbs if desired.
Transfer scallops to a warm plate, let rest for 1 minute. Finish with a squeeze of lemon, a sprinkle of herbs, and serve immediately to enjoy their tender, caramelized perfection.
How to Know It’s Done
- Golden-brown crust forms without burning the surface.
- Scallops are opaque and slightly firm to the touch when pressed.
- A gentle jiggle indicates they’re cooked through but tender inside.
Perfectly Seared Scallops
Ingredients
Equipment
Method
- Pat the scallops dry thoroughly with paper towels to remove excess moisture, which helps achieve a perfect sear. Season generously with kosher salt just before cooking.
- Preheat your heavy skillet over medium-high heat until it’s shimmering hot, and add the high smoke-point oil. Watch for it to just start smoking lightly—this indicates the pan is ready.
- Carefully place the scallops in the hot pan, leaving space between each to prevent steaming. Let them cook undisturbed for about 2 minutes, watching for a deep golden-brown crust to form and listening for a gentle sizzle.
- Use tongs to flip each scallop gently, revealing a beautifully caramelized surface. Sear the other side for another 1.5 to 2 minutes until opaque around the edges and golden underneath.
- Add a small knob of butter to the pan, then tilt it slightly to spoon the melted butter over the scallops for about 30 seconds, enhancing their richness and flavor.
- Check the scallops’ doneness by noting their opaque appearance and slight bounce when pressed. They should be firm yet tender, with a crispy exterior and juicy interior.
- Transfer the scallops to a plate, rest for 1 minute to allow juices to settle, then squeeze fresh lemon juice over them. Garnish with chopped herbs and freshly cracked black pepper.
- Serve immediately, enjoying their tender, caramelized exterior with a burst of citrus and fresh herbs. Savor the perfect balance of crispy crust and succulent interior.
Pro tips for perfect scallops
- Preheat your pan: Ensure the skillet is shimmering hot before adding scallops—this prevents sticking and promotes even searing.
- Dry scallops thoroughly: Pat them dry with paper towels; moisture is the enemy of that perfect golden crust.
- Use high smoke-point oil: Grape seed or canola oil handles high heat well, helping you get that crisp surface without burning.
- Don’t overcrowd: Leave space between scallops in the pan; overcrowding causes steaming instead of searing and dulls the crust.
- Baste with butter: Add a small knob of butter after flipping to enhance flavor and aid in even browning—tilt the pan and spoon the melted butter over.
- Cook until opaque: Scallops are done when they turn from translucent to opaque and have a firm yet tender feel—use visual cues and gentle jiggles.
- Rest briefly after searing: Let scallops sit a minute off heat before serving; this helps juices redistribute for maximum tenderness.
Common mistakes and how to fix them
- FORGOT to dry scallops thoroughly → Sopping scallops won’t sear properly, dry well before cooking.
- DUMPED oil into cold pan → Always preheat the pan before adding oil for even searing.
- OVER-TORCHED the butter → Butter burns quickly; add it after scallops develop a crust.
- MISSED the resting step → Rest scallops 1 minute after searing to retain juices and texture.
Quick Fixes for Perfect Seared Scallops
- If scallops release water, increase heat and sear quickly to evaporate moisture.
- Splash a little vinegar or lemon juice if scallops stick, to loosen and brighten flavor.
- Patch a shivering pan with a quick sprinkle of salt if surface isn’t crisping properly.
- When scallops are over-torched, lower heat immediately and add a splash of water to cool.
- Shield a burnt butter by removing from heat and adding fresh butter or oil for richness.
Prep, store, and reheat tips
- Pat scallops dry and season with salt ahead of time; store in an airtight container in the fridge for up to 2 hours. The surface stays dry, ensuring a better sear.
- Keep scallops refrigerated at 0°C (32°F) and use within 24 hours for optimal freshness and texture.
- Refrigerated scallops will develop a slightly firmer texture overnight; reheat gently if necessary, but best enjoyed fresh for maximum tenderness.
- To reheat, briefly warm scallops in a hot pan with a small amount of oil until just heated through—listen for a gentle crackle, and avoid overcooking to keep them tender.
Top questions about pan seared scallops
1. How do I choose the best scallops?
Look for dry, firm scallops with a slightly translucent center. Pat them dry thoroughly to get that golden crust.
2. What oil is best for searing scallops?
Use a high smoke-point oil like grapeseed or canola. It helps achieve a crisp surface without burning.
3. How hot should the pan be?
Heat your pan until shimmering hot, around 200°C (390°F), before adding oil and scallops.
4. How long do I sear each side?
Sear the scallops for about 2 minutes per side without moving them, until they develop a deep golden crust.
5. How do I flip scallops without breaking them?
Flip carefully using tongs or a spatula. Do not move them around in the pan to avoid tearing.
6. When should I add butter?
Add a small knob of butter after flipping, then spoon it over the scallops to enhance flavor and color.
7. How do I know when scallops are cooked?
Scallops are done when they turn opaque and have a firm but tender texture, with a caramelized exterior.
8. Should I rest the scallops after cooking?
Rest them for a minute after searing to allow juices to settle, then serve immediately for best texture.
9. Can I cook multiple scallops at once?
Overcrowding the pan causes steaming, not searing. Keep space between scallops for a crispy surface.
10. What if scallops stick to the pan?
If scallops stick, increase heat slightly and give them a moment; they’ll release when properly seared.
Seared scallops might seem simple, but nailing that perfect crust and tender inside takes a quiet focus. Each successful sear is a small victory that makes me appreciate the delicate dance of heat and patience.
In these busy times, it’s comforting to cook something that demands attention without fuss, reminding me that good things happen when you keep it straightforward and pay close attention to the process.

Hi, I’m Emily Carter, the founder of Absolute Chaos Mode. Born and raised in Portland, Oregon, I grew up in a household where dinner was equal parts delicious and unpredictable