
This cheese ball recipe isn’t just a dip; it’s a nostalgic throwback that lights up holiday tables and casual gatherings alike. I remember the first time I made it, the way everyone gathered around, eyes bright with anticipation, noses catching that cheesy, savory aroma. It’s simple, honest, and packed with enough charm to make any occasion feel a little more special.
There’s something about rolling a mixture of cream cheese, sharp cheddar, and crunchy nuts into a perfect sphere that feels almost ceremonial. It’s the kind of dish that sparks conversations, laughter, and maybe even a few childhood memories. I love how adaptable it is—whether you’re celebrating a holiday or just craving comfort food on a chilly evening, this cheese ball always finds a way to bring people together.
Focusing on how this cheese ball can be a nostalgic holiday centerpiece that sparks memories and brings people together around the table.
A Nostalgic Holiday Staple
- Making this cheese ball always takes me back to my grandma’s kitchen, where it was the highlight of every holiday feast.
- There’s a quiet pride in rolling that perfect sphere, knowing I’ve crafted something both simple and nostalgic.
- I love how the crunch of nuts and the gooey cheese combine, creating a messy, delicious moment that feels like a warm hug.
- Sometimes, I get a bit chaotic trying to coat it evenly, but it’s part of the charm—and it still tastes perfect.
- Sharing this at gatherings always sparks stories and laughter, reminding me how food can really bring people together.
The story behind this recipe
- This cheese ball recipe came about during a frantic holiday prep, when I needed something quick but impactful. I remembered how my mom used to make a simple cheese spread that everyone loved, and I thought, why not turn it into a festive sphere? It’s one of those dishes that feels humble but makes a statement, especially when coated with crunchy bits and served with good crackers.
- I’ve always loved the tactile joy of rolling cheese mixture into a ball—kind of like a small, edible sculpture. Over the years, I’ve tweaked the ingredients, but the core idea remains the same: a cozy, crowd-pleasing centerpiece that’s easy to assemble last minute. It’s not fancy, but it’s honest and familiar, with a little bit of chaos in the coating process that somehow makes it more memorable.
- heading: Nostalgic Crowd-Pleaser
Cheese Ball Trivia & History
- The cheese ball gained popularity in mid-20th-century America, often served at potlucks and family gatherings.
- Originally, cheese balls were a way to preserve cheese and serve it in a portable, shareable form before refrigeration was widespread.
- Early versions often included ingredients like pimentos or dried fruits, reflecting regional tastes and available ingredients.
- The classic cheese ball became a holiday staple in the 1960s, especially during Christmas and New Year’s parties.
Key ingredients and tips
- Cream cheese: I love how it creates that rich, velvety base; if you want a lighter feel, swap half for mascarpone, but you’ll lose some of that creamy punch.
- Sharp cheddar: It’s my go-to for a punch of flavor, especially when it melts into the cheese mixture. For a milder taste, try Monterey Jack—so smooth and less punchy.
- Nuts (walnuts or pecans): I prefer toasted nuts for that deep, smoky aroma. Skip if allergies are a concern, but add a sprinkle of toasted breadcrumbs for crunch.
- Herbs (chives or parsley): Fresh herbs brighten the whole thing with a burst of green and freshness. Dried herbs work in a pinch but lack that vivid flavor and aroma.
- Worcestershire sauce: Just a dash adds umami and depth, but if you want a sharper kick, try a splash of soy sauce instead—more salt, more umami.
- Spices (paprika or cayenne): A little smoky paprika lends color and warmth; if you like heat, sprinkle in cayenne, but start small—spicy sneaks up fast.
- Coating (crushed crackers or pretzels): I love the crunch of buttery crackers, but for a twist, try crushed herbed croutons—they add flavor and texture in one.
Spotlight on key ingredients
Cream cheese:
- I love how it creates that rich, velvety base; if you want a lighter feel, swap half for mascarpone, but you’ll lose some of that creamy punch.
- Sharp cheddar: It’s my go-to for a punch of flavor, especially when it melts into the cheese mixture. For a milder taste, try Monterey Jack—so smooth and less punchy.
- Nuts (walnuts or pecans): I prefer toasted nuts for that deep, smoky aroma. Skip if allergies are a concern, but add a sprinkle of toasted breadcrumbs for crunch.
Herbs and spices:
- Herbs (chives or parsley): Fresh herbs brighten the whole thing with a burst of green and freshness. Dried herbs work in a pinch but lack that vivid flavor and aroma.
- Worcestershire sauce: Just a dash adds umami and depth, but if you want a sharper kick, try a splash of soy sauce instead—more salt, more umami.
- Spices (paprika or cayenne): A little smoky paprika lends color and warmth; if you like heat, sprinkle in cayenne, but start small—spicy sneaks up fast.
Notes for ingredient swaps
- Dairy-Free: Swap cream cheese for a blended mixture of silken tofu and nutritional yeast—less creamy, more neutral flavor.
- Vegan Cheese: Use store-bought vegan cream cheese and shredded plant-based cheddar for a similar texture with a dairy-free touch.
- Nut-Free: Replace toasted nuts with crispy fried onions or sunflower seeds for crunch without allergies.
- Gluten-Free: Opt for gluten-free crackers or crushed rice cakes instead of traditional crackers for the coating.
- Smoky Flavor: Add a few drops of liquid smoke to the cheese mixture for a smoky punch without using smoked nuts.
- Herbs: Substitute fresh herbs with dried ones—use half the amount, as dried herbs are more concentrated in flavor.
- Spicy Kick: Incorporate a dash of hot sauce or cayenne into the mixture for extra heat, balancing richness.
Equipment & Tools
- Mixing bowl: To combine and mix the cheese ingredients thoroughly.
- Spatula or spoon: To stir and blend ingredients evenly.
- Plastic wrap: To shape and chill the cheese ball without sticking.
- Skillet or frying pan: To toast the nuts evenly and bring out their aroma.
- Serving platter: To present the finished cheese ball attractively.
Step-by-step guide to cheese ball
- Gather your ingredients: cream cheese, sharp cheddar, chopped nuts, fresh herbs, Worcestershire sauce, spices, and crackers for coating.
- In a large mixing bowl, soften 16 oz cream cheese at room temperature for about 15 minutes until smooth and pliable.
- Add 1 cup grated sharp cheddar, 2 tbsp chopped fresh chives, 1 tsp Worcestershire sauce, ½ tsp paprika, and a pinch of cayenne to the cream cheese.
- Mix everything thoroughly with a spatula or spoon until well combined, ensuring no lumps remain.
- Taste the mixture and adjust seasoning if needed—more herbs, spices, or a splash of hot sauce for extra kick.
- Place the mixture on a sheet of plastic wrap, then shape and roll into a tight sphere, about 15 cm (6 inches) in diameter.
- Wrap the cheese ball tightly and refrigerate for at least 2 hours—preferably overnight—to let flavors meld and firm up.
- While it chills, toast 1 cup chopped nuts in a dry skillet over medium heat until fragrant and golden, about 3-4 minutes.
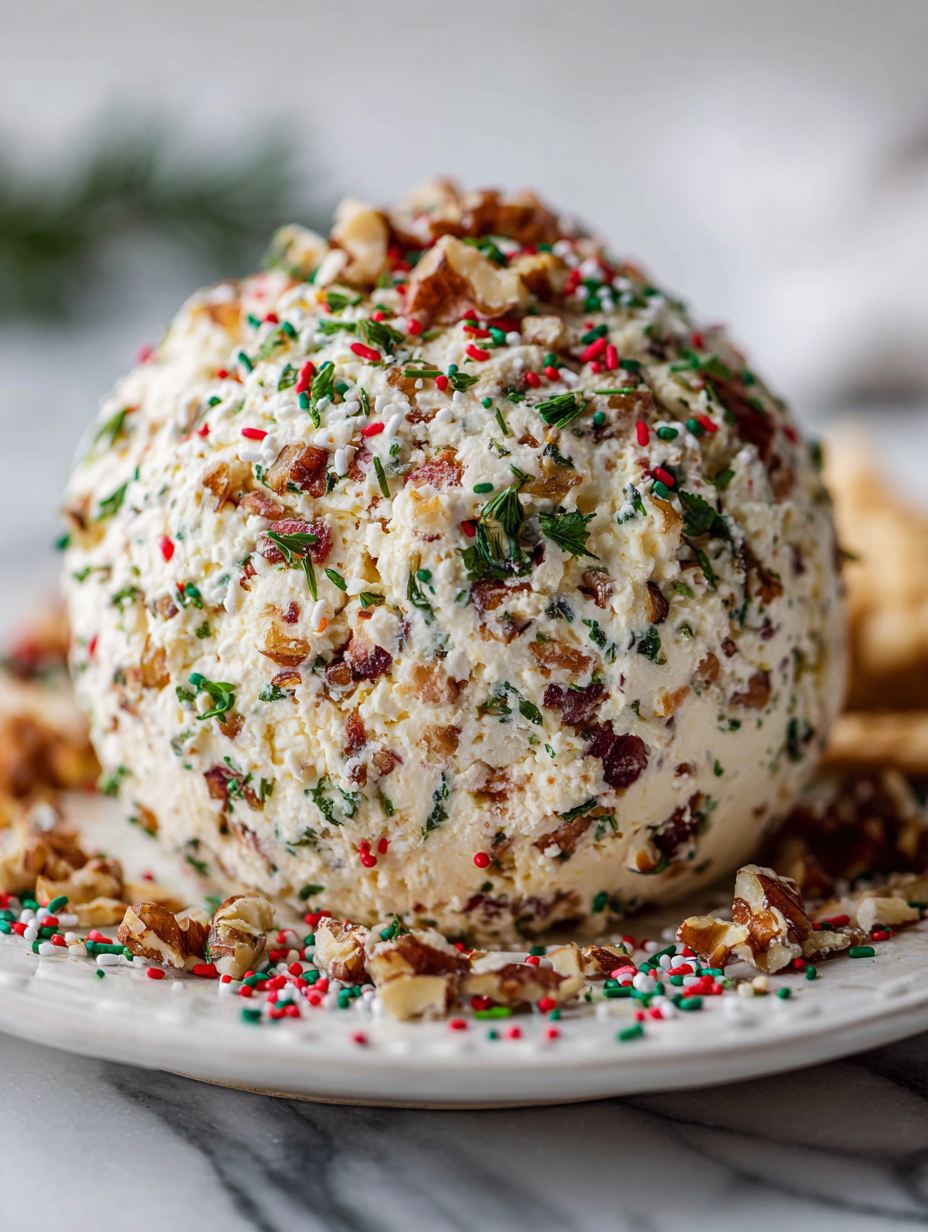
- Unwrap the chilled cheese sphere and roll it in the toasted nuts, pressing gently to adhere.
- For a more rustic look, press some nuts into the surface, or sprinkle with additional herbs for color.
- Transfer to a serving platter. Let sit at room temperature for 10-15 minutes before serving to soften slightly.
- Serve with an assortment of crackers, sliced baguette, or crisp veggie sticks.
Refrigerate the wrapped cheese ball for at least 2 hours or overnight. Before serving, bring it to room temperature for 10-15 minutes to soften. Roll in toasted nuts just before plating, then garnish with extra herbs if desired. Serve with crackers or veggie sticks for a casual, inviting presentation.
How to Know It’s Done
- Cheese mixture should be smooth, not grainy, with a cheesy aroma when ready.
- Nuts should be toasted golden, fragrant, and crunchy when pressed into the ball.
- The cheese ball should hold shape without cracking or cracking slightly when pressed.
Nostalgic Holiday Cheese Ball
Ingredients
Equipment
Method
- In a large mixing bowl, combine the softened cream cheese, shredded cheddar, chopped chives, Worcestershire sauce, paprika, and cayenne pepper. Mix thoroughly with a spatula until the mixture is smooth, creamy, and well blended, with no lumps remaining. This creates a rich, cheesy base with vibrant flavor.
- Transfer the cheese mixture onto a sheet of plastic wrap. Using the wrap, gently shape and roll the mixture into a tight sphere, about 6 inches in diameter. Wrap it securely and refrigerate for at least 2 hours, or overnight, to allow flavors to meld and the shape to firm up.
- While the cheese ball chills, toast the nuts in a dry skillet over medium heat until fragrant and golden, about 3-4 minutes. Stir frequently to prevent burning. Once toasted, coarsely chop the nuts and set aside.
- Unwrap the chilled cheese ball carefully and place it on a serving platter. Pour the toasted nuts onto a shallow plate or bowl.
- Gently roll the cheese ball in the toasted nuts, pressing lightly to help the nuts adhere to the surface. For a rustic look, press some nuts into the surface, or sprinkle additional herbs for color and visual appeal.
- Transfer the coated cheese ball to a clean serving platter. Let it sit at room temperature for 10-15 minutes before serving to soften slightly and enhance flavors. Serve with an assortment of crackers, baguette slices, or fresh veggie sticks for a festive, nostalgic presentation.
Notes
Pro tips for cheese ball success
- Chill the mixture: Ensure the cheese mixture is well chilled before shaping to prevent sticking and make rolling easier.
- Toast nuts thoroughly: Toast nuts until fragrant and golden for maximum crunch and smoky aroma that enhances the coating.
- Use room temperature ingredients: Let cream cheese and butter sit out 15 minutes for smoother mixing and better incorporation.
- Add herbs gradually: Mix herbs in last to preserve their bright flavor and avoid overpowering the cheese base.
- Press nuts firmly: When coating, press nuts into the sphere gently but firmly to ensure they stick and don’t fall off.
- Serve at room temp: Let the cheese ball sit out 10-15 minutes before serving to soften slightly and intensify flavors.
- Avoid overmixing: Mix until just combined—overmixing can make the cheese mixture dense and tough to shape.
Common mistakes and how to fix them
- TOO MUCH CHEESE: Reduce cheese for a firmer ball, but risk dryness if too little.
- OVER-TORCHED NUTS: Keep an eye on nuts during toasting to prevent burning and bitterness.
- MISTAKENLY SKIPPING CHILL: Skip refrigeration, and the ball won’t hold shape or meld flavors properly.
- USING LOW-FAT DAIRY: Lower-fat cheeses may result in a softer, less cohesive cheese ball, affecting texture.
Fast fixes for cheese ball mishaps
- If cheese ball cracks, gently press nuts into the surface to hide imperfections.
- When mixture is too soft, chill it for 30 minutes before shaping again.
- Splash a bit of lemon juice if cheese mixture smells sour or too tangy.
- Patch a cracked cheese sphere by smoothing with a spatula and re-coating in nuts.
- Shield from dryness by wrapping tightly and adding a touch of moisture before serving.
Prep, store, and reheat tips
- You can assemble the cheese ball a day in advance; wrap it tightly and keep it chilled for up to 24 hours. The flavors meld better overnight, and it firms up nicely, making it easier to coat with nuts later.
- Store the uncoated cheese ball in an airtight container in the fridge. It will stay fresh for 2-3 days, but the texture may soften slightly and lose some crunch if kept too long.
- Refrigerated cheese balls develop a firmer texture and richer cheesy aroma. To serve, let it sit at room temperature for about 10 minutes—this enhances flavor and makes it softer and more inviting.
- Reheating is not necessary—serve cold or slightly softened. If you prefer it warmer, gently warm in a low oven (about 150°C/300°F) for 10 minutes, until just warm and fragrant, but be careful not to melt the cheese entirely.
- For the best sensory experience, consume within 3 days. After that, the nuts may lose their crunch, and the cheese could develop a slightly grainy texture.
Top questions about cheese balls
1. How do I know when my cheese ball is done?
A cheese ball should feel firm but still slightly soft when gently pressed, with a cheesy aroma filling the air. It shouldn’t be crumbly or too sticky.
2. What should the finished cheese ball look and smell like?
It should hold its shape when rolled in nuts and have a golden crust from the toasted coating. The aroma should be cheesy and nutty.
3. Can I make the cheese ball ahead of time?
Use room temperature cream cheese and softened butter for easier mixing and smoother texture. Cold ingredients make it lumpy and hard to shape.
4. How far in advance can I prepare the cheese ball?
Yes, you can prepare it a day in advance. Wrap it tightly and keep it refrigerated. Let it sit at room temp for 10 minutes before serving.
5. How should I toast nuts for coating?
Toast the nuts until fragrant and golden; this intensifies their flavor and adds crunch. Keep an eye on them to prevent burning.
6. What if my cheese mixture is too soft to shape?
If the mixture is too soft, chill it for 30 minutes. If nuts aren’t sticking, press them firmly into the surface or re-coat as needed.
7. Can I make a dairy-free cheese ball?
Switch to vegan cream cheese and shredded plant-based cheese for dairy-free options. Use crunchy seeds instead of nuts for nut allergies.
8. Can I customize the herbs and spices?
Use dried herbs instead of fresh—reduce the quantity by half, as they are more concentrated. For added flavor, try smoked paprika or hot sauce.
9. How do I avoid overmixing the cheese mixture?
Avoid overmixing to prevent the cheese from becoming dense. Mix just until ingredients are combined for a light, fluffy texture.
10. What if my cheese ball cracks during coating?
If the cheese ball cracks while coating, press crushed nuts into the surface to hide imperfections and reinforce the shape.
This cheese ball isn’t just a nostalgic appetizer; it’s a reminder of how simple ingredients can come together to create something warm and inviting. Each bite carries a bit of messy charm and a lot of flavor, perfect for sharing with friends or family. Sometimes, the most unpolished dishes turn out to be the most memorable.
In the end, it’s about the stories that unfold around the table—laughter, good conversation, and that unmistakable aroma of cheesy goodness. No matter the occasion, this cheese ball has a way of making everyone feel at home, even in the chaos of last-minute prep or the rush of holiday gatherings. It’s imperfect, honest, and just right for right now.

Hi, I’m Emily Carter, the founder of Absolute Chaos Mode. Born and raised in Portland, Oregon, I grew up in a household where dinner was equal parts delicious and unpredictable