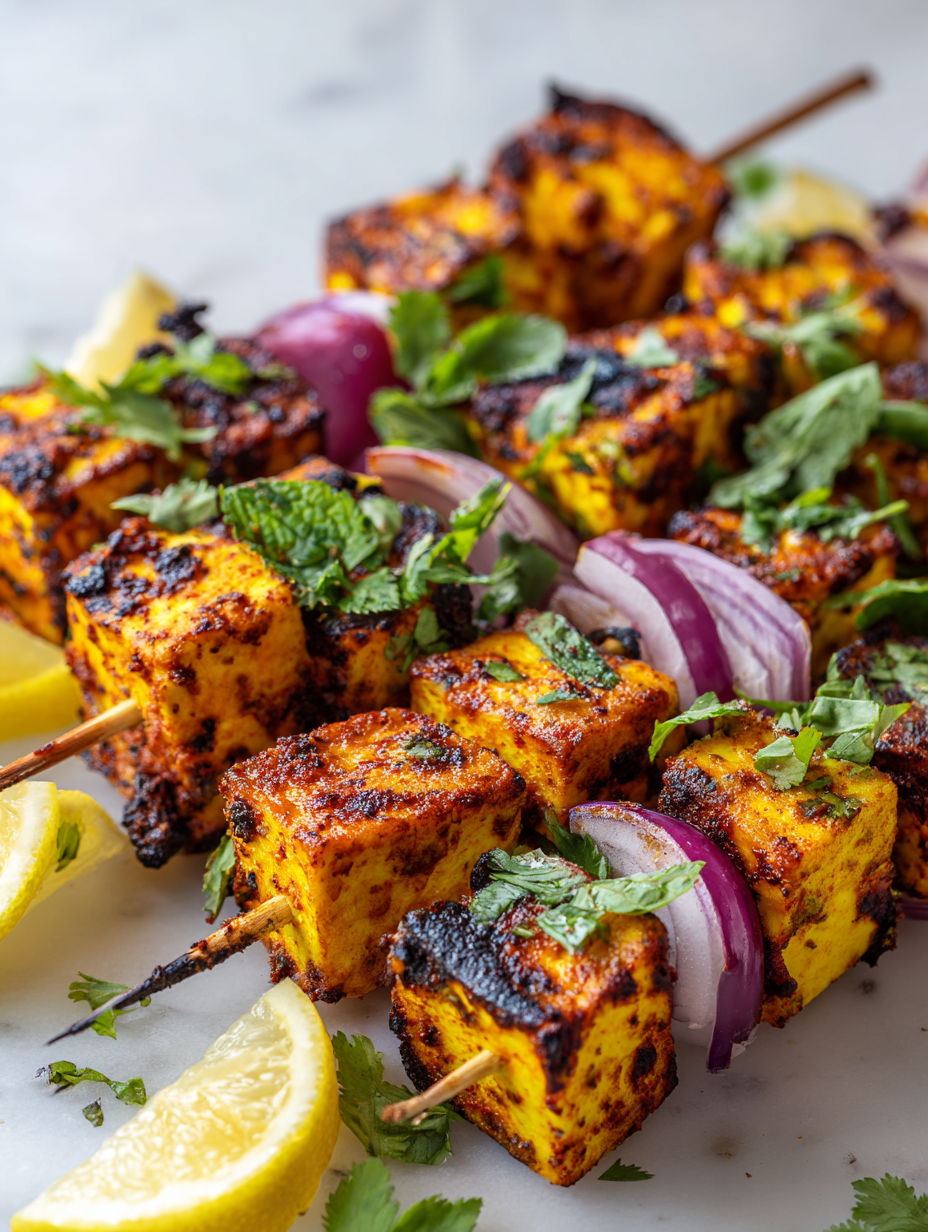
Focusing on the smoky, charred edges of paneer tikka, this recipe emphasizes achieving the perfect balance between a crisp exterior and a creamy, tender inside, highlighting the importance of technique and patience in grilling.
There’s something almost meditative about waiting for those edges to char just right, releasing that irresistible smell of spices and smoke. It’s a dish that rewards careful attention, especially when you want that deep, smoky flavor that makes every bite memorable.
Making paneer tikka at home isn’t just about the marinade or the grill — it’s about the small moments of trial and error that turn a simple appetizer into something with real depth. Once you get that perfect char, it’s hard not to keep reaching for another piece.
Focusing on the smoky, charred edges of paneer tikka, this recipe emphasizes achieving the perfect balance between a crisp exterior and a creamy, tender inside, highlighting the importance of technique and patience in grilling.
The story behind this recipe
One evening, I was experimenting with spices and realized that the secret to great paneer tikka isn’t just the marinade — it’s the way you handle the grill. I remember the first time I managed that perfect smoky char, feeling like I had cracked some unspoken code. Since then, I’ve been chasing that moment, tweaking the marinade and the heat, trying to get that balance of crisp and tender just right. It’s a simple dish, but each batch feels like a small victory, especially when those edges crackle with flavor and the aroma fills the kitchen.
Ingredient breakdown
- Paneer: I like using fresh, firm paneer — it develops a nice crust when grilled and stays tender inside. If yours feels too soft, try pressing out excess moisture first.
- Yogurt: I opt for thick Greek-style yogurt for the marinade — it clings better and gives a richer flavor. Thin or runny yogurt can make the marinade watery and less flavorful.
- Spices: I keep a mix of cumin, coriander, and smoked paprika — they add warmth and a subtle smoky depth. Feel free to tweak the spice levels to match your heat tolerance.
- Lemon juice: Brightens up the marinade with a citrus tang that cuts through the richness. Don’t skip it, or the flavors might feel flat; or add a splash of vinegar if lemon’s unavailable.
- Oil: I prefer neutral oils like vegetable or canola for the marinade, but a touch of mustard oil adds an authentic smoky note if you like it bold. Watch out for excess oil on the paneer to prevent sogginess.
- Bell peppers/onions: These veggies add color and slight sweetness, but I keep them chunky so they don’t burn quickly on the grill. Marinate them alongside the paneer for more flavor.
- Wooden skewers: Soak them for 30 minutes before threading — it prevents burning and makes flipping easier. Metal skewers work too, but I love the rustic feel of wood.
Spotlight on key ingredients
Paneer:
- I prefer fresh, firm paneer that develops a nice crust and stays tender inside. If yours feels too soft, try pressing out excess moisture first.
- Paneer’s behavior during grilling: It develops a golden crust with slightly charred edges, offering a smoky aroma. Handle gently to prevent breaking apart.
Yogurt:
- I use thick Greek-style yogurt for the marinade—clings better and adds richness. Thin yogurt can make the marinade watery and less flavorful.
- Yogurt’s role: It tenderizes the paneer and helps spices adhere. During cooking, it chars slightly, adding a smoky depth, so don’t skip it.
Notes for ingredient swaps
- Dairy-Free: Use coconut yogurt instead of regular yogurt for a subtly sweet, tropical twist. It’s thinner, so add a teaspoon of flour to stabilize.
- Vegan Paneer: Substitute with firm tofu, pressed and cut into cubes. Tofu absorbs marinade well but won’t develop the same rich flavor.
- Spice Blend: Swap smoked paprika for chipotle powder for a deeper smoky kick. Adjust quantity to suit your heat tolerance.
- Lemon Juice: Replace with apple cider vinegar for a sharper tang. Use sparingly to avoid overpowering the spices.
- Oil: Use sesame oil for a nutty aroma or avocado oil for a mild flavor. Both add richness but alter the overall flavor profile.
- Bell Peppers: Keep it simple with zucchini or cherry tomatoes if you want a softer, less charred veggie note. Just adjust grilling time.
- Skewers: Metal skewers work perfectly, but if you only have wooden, soak them longer—up to an hour—to prevent burning.
Equipment & Tools
- Grill or grill pan: To achieve smoky, charred flavor and grill marks.
- Wooden or metal skewers: To hold paneer and vegetables for grilling.
- Mixing bowl: To prepare and coat the marinade.
- Brush or tongs: To turn and baste the tikka during grilling.
- Refrigerator: To marinate the paneer and keep it chilled.
Step-by-step guide to paneer tikka
- Equip your grilling setup: preheat your grill or grill pan to medium-high, around 200°C (390°F). Make sure grates are clean and oiled to prevent sticking.
- Prepare the skewers: soak wooden skewers in water for 30 minutes. Metal skewers are ready to go. Set aside near your workspace.
- Cut the paneer: slice into 1-inch thick cubes. Pat dry to remove excess moisture, which helps in achieving a good char.
- Make the marinade: in a bowl, combine yogurt, spices (cumin, coriander, smoked paprika), lemon juice, and a splash of oil. Whisk until smooth.
- Marinate the paneer: coat each cube thoroughly, cover, and refrigerate for at least 30 minutes, ideally up to 2 hours for deeper flavor.
- Thread the paneer: slide the marinated cubes onto the skewers, intersperse with chunks of bell peppers or onions if using. Keep pieces spaced for even cooking.
- Grill the tikka: place skewers on the hot grill. Cook for 4-5 minutes per side, turning frequently to develop a smoky, charred exterior. The paneer should be golden and slightly crispy.
- Check for doneness: the edges should be blackened in spots, the paneer should feel firm but tender, and smell smoky with spices.
- Rest the skewers: remove from heat and let rest for 2 minutes. This helps juices settle and prevents overcooking during plating.
- Serve hot: garnish with fresh coriander, squeeze extra lemon if desired, and enjoy the crispy, smoky bites.
Once grilled, let the paneer tikka rest for 2 minutes off the heat. Serve hot, garnished with fresh coriander and a squeeze of lemon for brightness.
How to Know It’s Done
- Paneer has a golden, slightly charred exterior with smoky aroma.
- Edges crackle when pressed, indicating crispness.
- Paneer feels firm but yields slightly when pressed, not mushy.
Smoky Paneer Tikka
Ingredients
Equipment
Method
- Cut the paneer into 1-inch cubes and pat dry with a paper towel to remove excess moisture.
- Soak wooden skewers in water for at least 30 minutes to prevent burning during grilling.
- In a mixing bowl, whisk together thick yogurt, cumin, coriander, smoked paprika, lemon juice, and oil until smooth and well combined.
- Coat each paneer cube thoroughly with the marinade, ensuring all sides are coated. Cover and refrigerate for at least 30 minutes, up to 2 hours.
- Thread the marinated paneer cubes onto the soaked skewers, alternating with chunks of bell pepper and onion for added flavor and color.
- Preheat your grill or grill pan to medium-high heat (around 200°C or 390°F). Lightly oil the grates or pan to prevent sticking.
- Place the skewers on the hot grill, cooking for about 4-5 minutes per side. Turn frequently with tongs, listening for a crackling sound and watching for developing dark, charred spots.
- Continue flipping until the paneer is golden with some blackened edges, and the aroma of smoke and spices fills the air.
- Remove the skewers from the grill and let rest for 2 minutes. This helps juices settle and enhances flavor.
- Garnish with fresh coriander and squeeze extra lemon over the top before serving hot. Enjoy the crispy, smoky bites!
Pro tips for perfect paneer tikka
- Boldly char: Press the paneer slightly on the grill to deepen the smoky flavor and develop that crispy crust.
- Sizzle test: When grilling, listen for a crackling sound to know the edges are crisping up nicely.
- Color check: Aim for a deep golden hue with some blackened spots for authentic smoky flavor.
- Oil management: Brush the paneer lightly with oil before grilling to prevent sticking and promote even browning.
- Flip carefully: Turn the skewers frequently to ensure uniform char and avoid burning one side too quickly.
- Rest time: Let the grilled paneer rest for 2 minutes off heat—this keeps it juicy and prevents it from drying out.
- Marinade magic: Use thick yogurt and marinate for at least 30 minutes—this ensures rich flavor absorption and tenderized paneer.
Common mistakes and how to fix them
- FORGOT to soak wooden skewers → Soak for 30 minutes to prevent burning.
- DUMPED marinade too early → Marinate at least 30 minutes for flavor penetration.
- OVER-TORCHED paneer → Turn skewers frequently and watch for blackened edges.
- UNDER-seasoned spices → Adjust spice levels to suit your heat preference for depth.
Quick fixes and pantry swaps
- When the paneer isn’t crisp enough, splash a little water on the grill and cook for 30 seconds more.
- If skewers burn too quickly, patch with aluminum foil around the ends to shield from direct heat.
- Splash lemon juice over slightly charred paneer to brighten flavors and mask any bitterness.
- When marinade feels too thin, add a teaspoon of chickpea flour to thicken and improve adherence.
- DUMPED marinade too early? Rest the paneer for 10 minutes before grilling to allow flavors to settle.
Prep, store, and reheat tips
- Marinate the paneer: Prepare the marinade and coat the paneer cubes up to 2 hours in advance for deeper flavor. Keep refrigerated and covered; the spices and yogurt meld beautifully overnight, enhancing the smoky taste.
- Skewer prep: Thread the marinated paneer and vegetables onto skewers and store in an airtight container for up to 24 hours. Keep chilled to prevent spoilage and ease grilling later.
- Refrigerator shelf life: Grilled paneer tikka is best enjoyed fresh, but leftovers can last 1-2 days in the fridge. The smoky flavor diminishes slightly, but it still retains a satisfying texture.
- Reheating: To reheat, place skewers on a hot grill or under a broiler for 2-3 minutes until warmed through and slightly crispy. Watch for over-charring; the smoky aroma should rekindle quickly, and the edges will crackle again.
Top questions about paneer tikka
1. How do I get the perfect crust on paneer?
Use firm, fresh paneer and press out excess moisture before marinating. It helps develop a nice crust and stays tender inside.
2. Can I use wooden skewers without soaking them?
Soak wooden skewers in water for 30 minutes to prevent burning. Metal skewers are ready to use as is.
3. How long should I marinate the paneer?
Marinate the paneer for at least 30 minutes, but up to 2 hours. Longer marination deepens flavor and tenderizes.
4. What temperature should the grill be?
Preheat your grill or pan to around 200°C (390°F). Look for a hot, even temperature for good char and smoky flavor.
5. How often should I flip the paneer tikka?
Turn the skewers frequently, about every 2 minutes, to prevent burning and ensure even charring.
6. How do I know when the paneer is done?
Look for deep golden color with some blackened spots, a smoky aroma, and edges that crackle when pressed.
7. Can I substitute yogurt in the marinade?
Use thick Greek-style yogurt for better adhesion and richer flavor. If unavailable, regular yogurt works, but may be less creamy.
8. Can I make this vegan?
For a vegan version, substitute paneer with pressed, firm tofu. It absorbs flavors but lacks the same richness.
9. What if I don’t have lemon juice?
Add a splash of lemon juice or vinegar for brightness. Adjust based on your preference to keep flavors lively.
10. How should I reheat leftovers?
Reheat grilled paneer tikka in a hot skillet or under a broiler for 2-3 minutes until crispy and smoky again.
Pulling together this paneer tikka, I’m reminded how simple ingredients can become something deeply satisfying. Each smoky, charred bite carries a bit of chaos and a lot of love, especially when grilled over a good flame. It’s not just about the flavor — it’s the slow, attentive process that makes it memorable.
In the end, it’s a dish that invites you to experiment and trust your senses — a little more color, a little more char, a squeeze of lemon. Sharing it with others, watching their eyes light up, makes the effort worth it. That’s what keeps me coming back to this recipe, again and again.

Hi, I’m Emily Carter, the founder of Absolute Chaos Mode. Born and raised in Portland, Oregon, I grew up in a household where dinner was equal parts delicious and unpredictable